
Project Ultimate 83 GTI
Suspension, Steering & Braking Systems
Suspension
One of the challenges encountered when upgrading the stock Mk1 GTI suspension relates to improving chassis stiffness and the other is dealing with the limited front-end suspension travel once the car is lowered 1.5” (leaving a tire to fender gap of ¾”). The Mk1 GTI needs compliance to keep tires firmly planted on the road but also enough stiffness to allow for aggressive steering/corning inputs. Old school shocks have a single valve/fixed orifice that may control the springs when steady-state forces are involved but when a bump is encountered the car is thrown into the air, losing the tire contact on the road. The modern KW coil-overs not only have 16 way adjustable compression/rebound settings but also employ 2 circuits – one is the bypass which opens up and allows the suspension to travel when bumps are encountered – allowing the tires to keep in contact with the road when FIA curbs or large road bumps are encountered. When setup properly the original playfulness of the OEM Mk1 GTI is maintained with far higher grip/performance, assuming the chassis is up to the challenge (which in this case is far stiffer than OEM). On the street with 250/200lbs springs and soft shock settings the car is now capable of 1g corning forces, and with slicks, 440/350lbs springs and stiffer shock settings (and slicks) over 1.4g of corning is possible.
Febi Bilstein Upper Strut Mounts/Urethane added to underside for stiffness/support/longevity
KW Variant 3 coilovers, stainless steel, compression and rebound adjustable - 16 steps
250lbs/in Eibach/Ground Control front springs (vs. 342 stock KW V3 – both sets inc)
200lbs/in Eibach/Ground Control rear springs (vs. 285 stock KW V3 – both sets inc)
Autotech 28mm hollow rear sway bar with urethane bushings
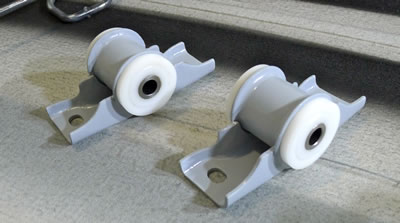
Delrin rear axle bushings
Urethane front A-arm bushings
5mm front wheel spacers to allow OEM snowflake wheels to clear calipers
15mm rear axle spacers + 3mm wheel spacers (front/rear track is now equal)
1.2 degrees of negative camber front/rear, 1/16” toe out front
Steering
Modern cars have a lot going for them but steering ‘feel’ is not one of them. Get behind the wheel of any modern sports car and you immediately feel isolated from the road and the driving experience. Much of this has to do with the software and hydraulic systems that are in-between your hands and the tie-rod ends connected to the wheels. The old-school Mk1 GTI had a completely manual rack & pinion steering system – you felt everything in your hands. But one problem with the OEM R&P was the high number of turns lock-to-lock and upgrading to a quick ratio Quaife R&P solved that problem but makes the steering very high effort when the car is not moving – so to get the benefit of a manual quick-ratio R&P you also have to learn to get the car moving before you start to turn the wheel – this is a learned behaviour in parking lots.
The reward is very precise, high road-feel steering which is a real treat to experience in this day and age. Note: the OEM manual steering racks use a simple pinion depth adjustment bolt/spring and it is a long process of trial and effort to get the setting ‘right’ – in my case the R&P came in and out of the car 6 times before it was deemed ‘perfect’, and involved machining a small bushing to improve the on-center feel and precision. Perfection does not come easy with these old-school R&P boxes.
The Mk1 GTI has a large plastic steering wheel that to my tastes is a bit dated and dull feeling so I had the steering wheel slightly ground down, adding a thin layer of high density foam and then Italian leather wrapping to create a very nice ‘feel’ to it with all of the retro looks of the original wheel – one of the best aspects of this project!
Mk1 GTIs also suffer from worn out steering U-joints and there are no after-market replacements available. I found a work-around/upgrade that involved fabricating a new double-u-joint system from late model Mercedes parts – I now have a built-proof, zero-play steering column connection to the R&P that is a thing of beauty. Finally, the OEM steering column is not very precisely located in the dash so a stainless steel support bracket was fabricated to keep it in place plus upper and lower bearings were installed as well – now the steering wheel is rock solid.
Custom leather wrapped GTI wheel
Custom upper and lower steering column bearings
Custom stainless steel steering column support brace
Quaife quick-ratio R&P gears
Custom bushing for pinion depth setting
Custom double-U-joint coupler, ends taken from late-model Mercedes
Urethane R&P bushings
Brakes
One area where the original Mk1 GTI did not excel was in the braking department with its tiny single piston caliper 9.4” front rotors and rear drums. Stuffing in large 11” front rotors is not the answer though as it puts too much unsprung weight in play, keeping the wheels/tires from staying in in contact with the road over rough surfaces – unsprung weight is a killer and so big brakes are to be avoided if possible. And 11” rotors simply will not fit inside an OEM 14x6 snowflake rim which is an absolute requirement for my car. The correct spec is 10.1” front rotors with special calipers …
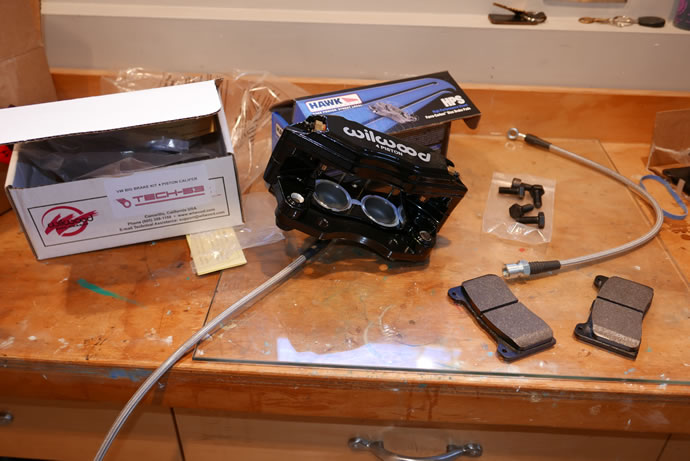
Another area of concern is the ugly problem of front/rear brake bias when upgrading to the Mk2-4 rear disk brakes as the increased braking torque at the rear causes rear-wheel lockup if the correct proportioning valves are not installed – and the stock prop valves were designed to vary pressure according to the rear twist-beam axle movement during panic braking which doesn’t make any sense with stiffer after-market suspension setups. So an after-market prop valve needs to be installed but it still isn’t enough to completely tame the balance problem … unless you use the unique Tech-53/Wilwood 4 piston front calipers which have 60% more surface area and stopping torque in comparison to other calipers – and in one simple swap they eliminate the balance problem, allowing for optimum braking.
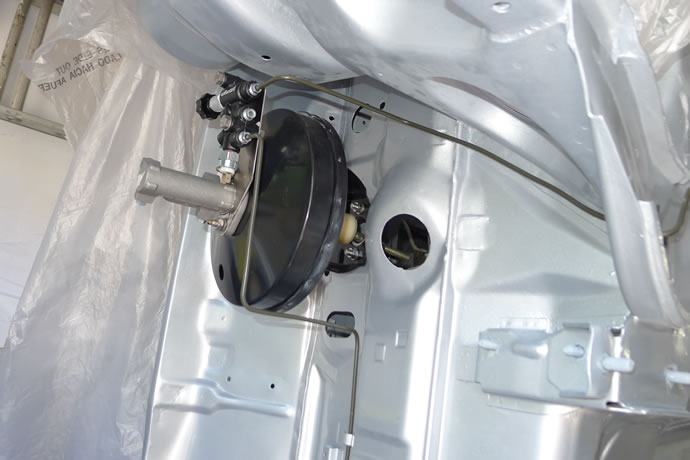
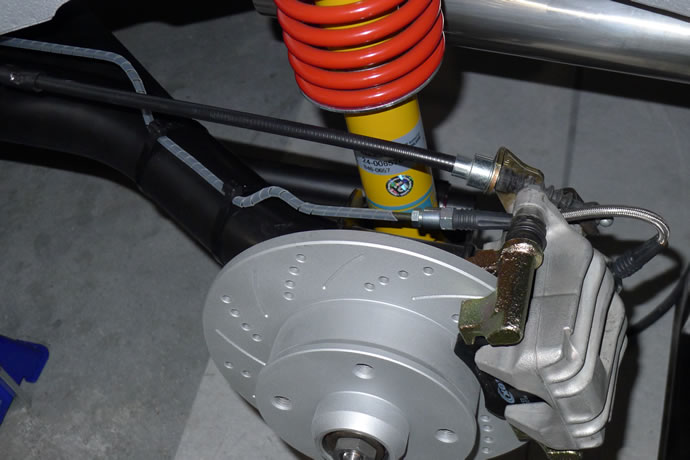
Running the e-brake cables usually involves having them hang under the rear twist-beam axle trailing arms in an unsightly manner so I welded in new e-brake tubes that tuck the cables under the fuel tank and route the brake lines and e-brake cables to the rear calipers which are inverted so all lines are above the trailing arms. The only issue created is that the calipers need to be unmounted and flipped around when bleeding the lines.
There are 2 recommended brake pads for the Tech-53/Wilwood 4 piston front calipers: a Hawk street performance compound which provides for dust and noise free braking with significant braking torque without eating the rotors, and a race-only Hawk DTC-60 compound which dramatically increases the stopping power when slicks are used but also kills a set of rotors in less than 2 hours of racing – the pads are also very dusty and noisy. On the track they allow for serious levels of braking forces, above 1.4g but you simply have to keep an eye on the rotors as they will wear very quickly and start to crack if you are using drilled rotors – slotted-only rotors are the right choice for track days. Cooling ducts are also important additions for track use – keeping the rotor temperatures under control. High temperature Castrol SRF brake fluid is used to keep the need for flushing/replacing fluid to a minimum.
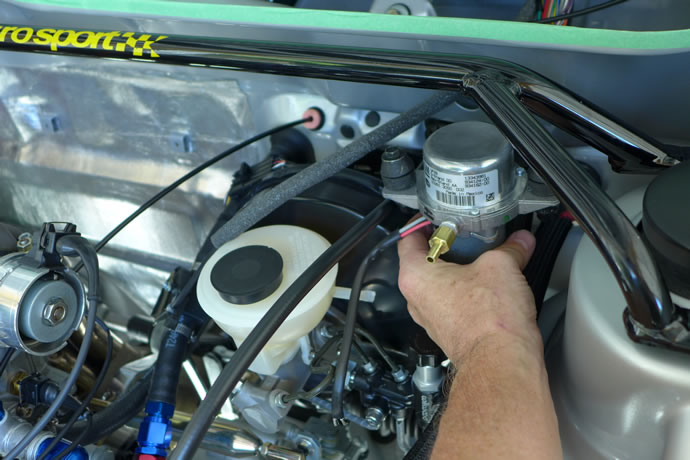
The engine with its ITBs and 288 cams doesn’t produce enough manifold vacuum to operate the brake servo so an ECU controlled electric vacuum pump is employed, allowing for dashboard control over the amount of brake pressure desired – a nice feature that allows for higher brake pressures on the track and less pressure on the street …
Front: 10.1” slotted/vented high performance rotors
Front: Tech-53/Wilwood aluminum 1.625” dia 4 piston calipers
Rear: VW Mk2-4 slotted solid rotors
Rear: VW Mk4 aluminum calipers, axle offset 15mm with CNC spacers
Wilwood proportioning valve
25.4mm master cylinder
Castrol SRF racing brake fluid
ECU controlled vacuum pump for the brake servo
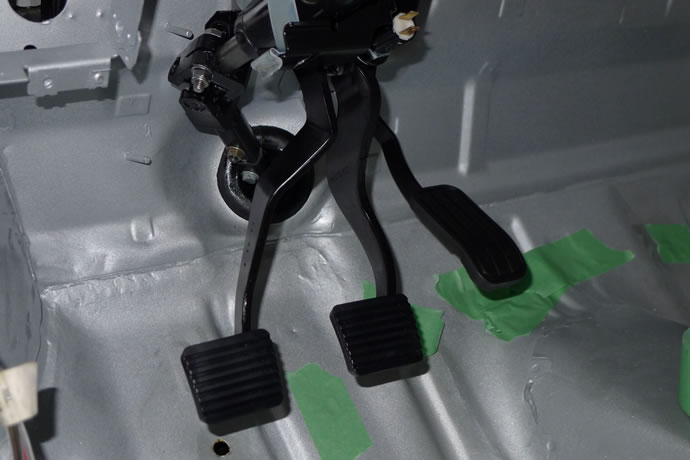
Adjustable brake pedal position to allow for accurate heel-and-toe foot positioning relative to the throttle pedal
The timeline story of the suspension, steering and brake system fabrication process
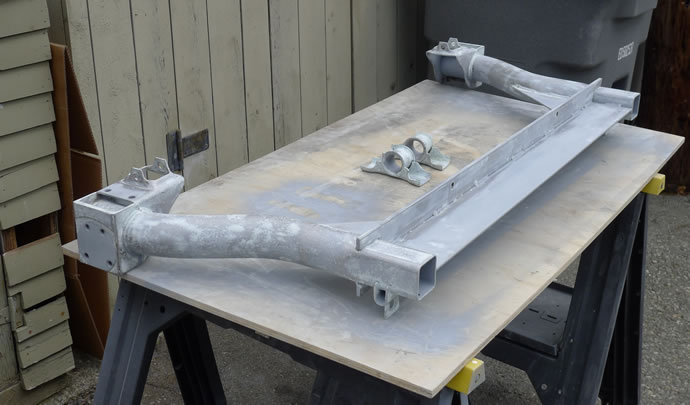
I busted my butt scraping, grinding, sanding and acid etching the rear trailing arm suspension over the past week. It was pretty rusty and therefore I took a lot of time to fill all of the pitting and smoothing all of the parts before painting with multiple coats of epoxy. I am waiting for some SPI black epoxy which I will use for the final coats. I will also press in the Delrin bushings soon. - April 14, 2014
Acid etching the metal to remove the rust ...

Filling all of the rust pits after a coat of epoxy ...
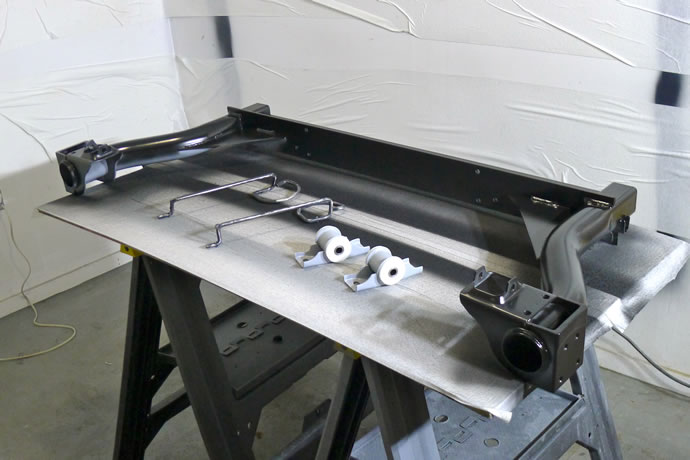
Getting the final black epoxy finish applied to the rear beam axle, and completing the press-fit of the Delrin bushings - May 4, 2014
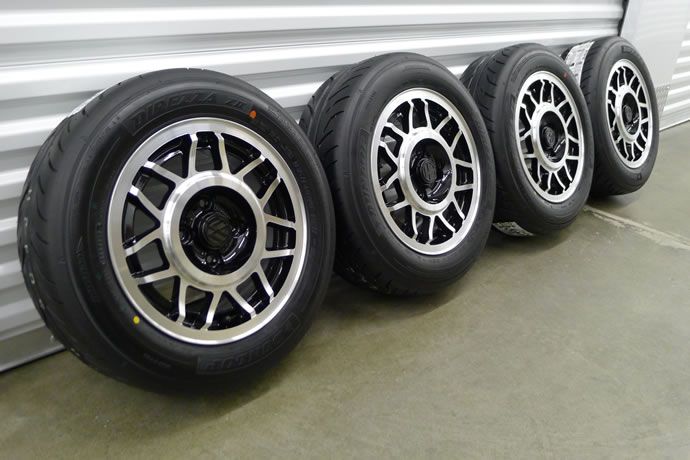
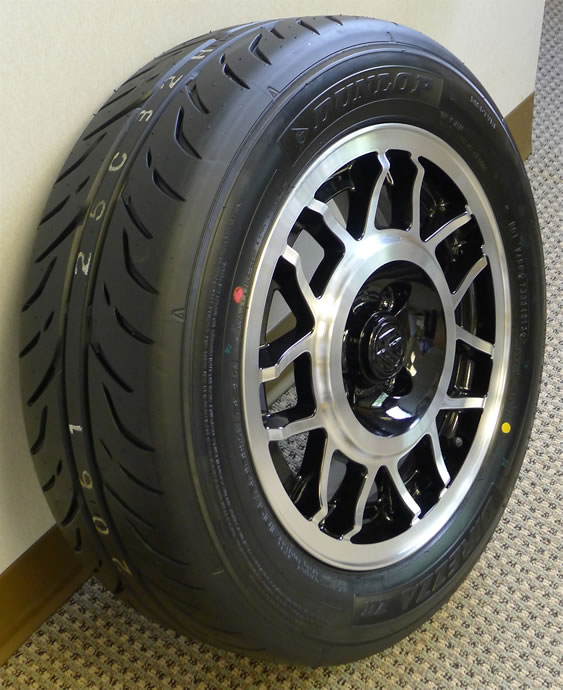
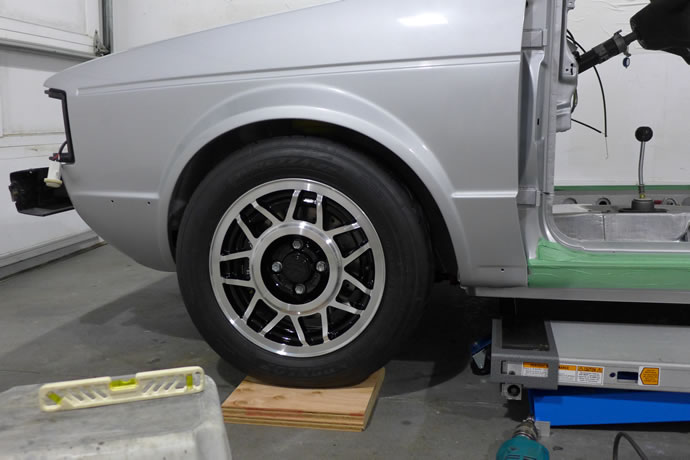
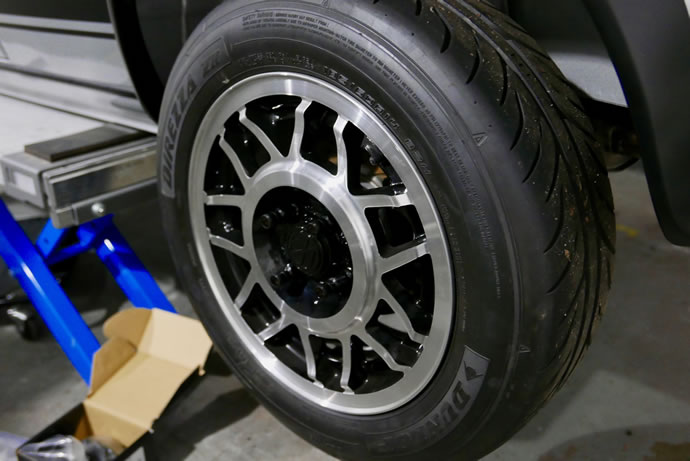
I got Greens Automotive in Richmond, BC to carefully re-straighten, re-weld, re-machine (inside and out) and paint these 14x6 OEM Snowflakes and then mount super sticky Dunlop Direzza ZII track/sport tires. The look I am after is old school - not the current fad of using 8" rims and stretched 195 tires, but never-the-less, with serious performance capabilities - May 8, 2014
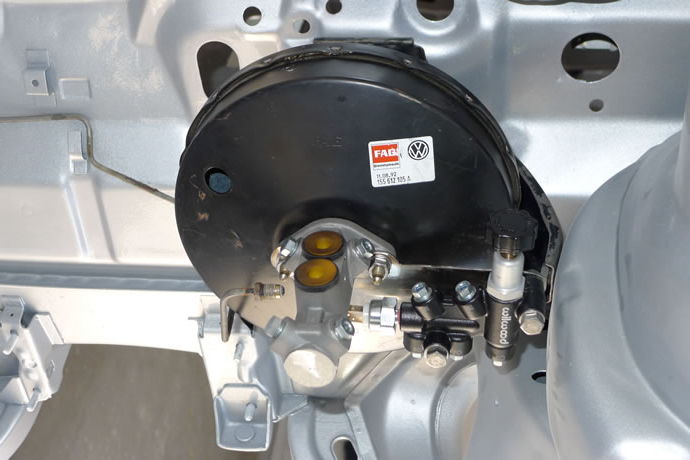
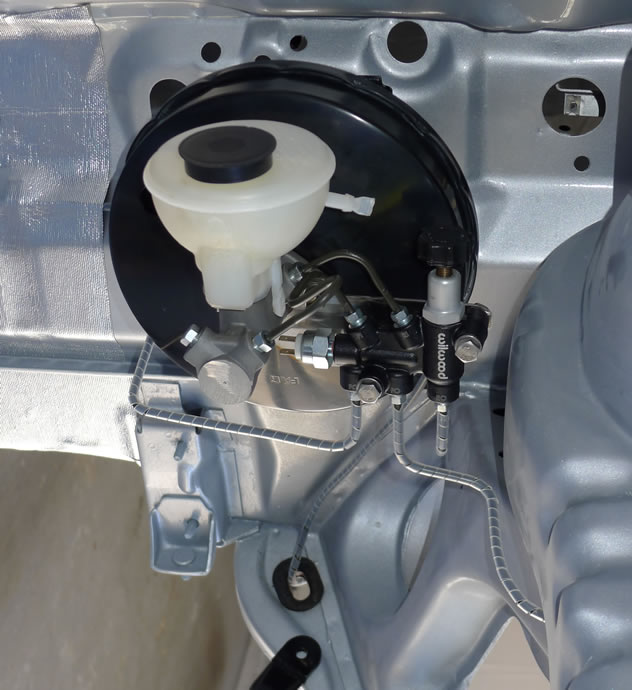
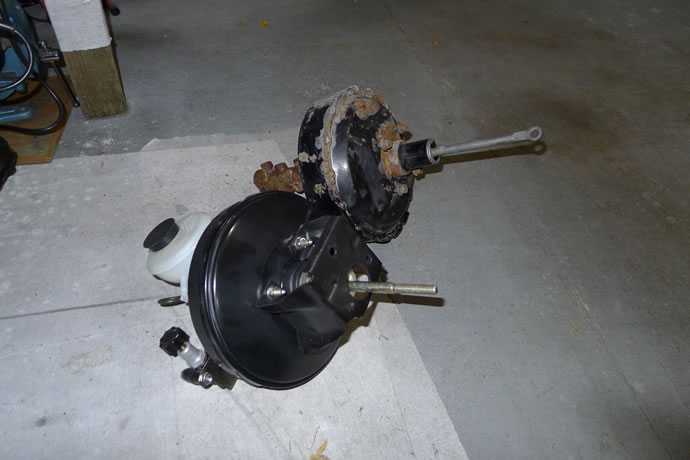
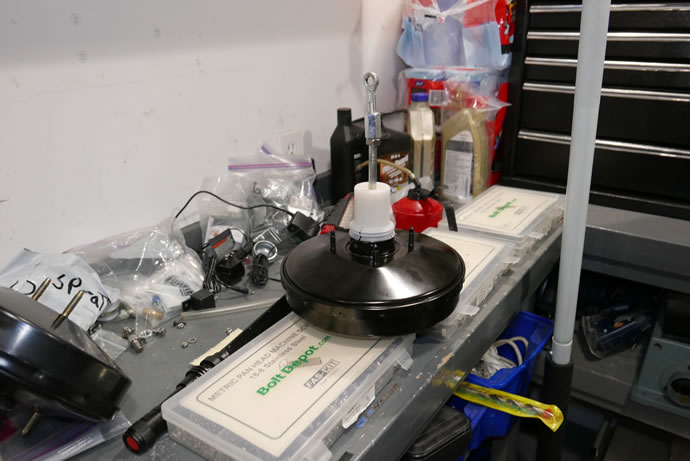
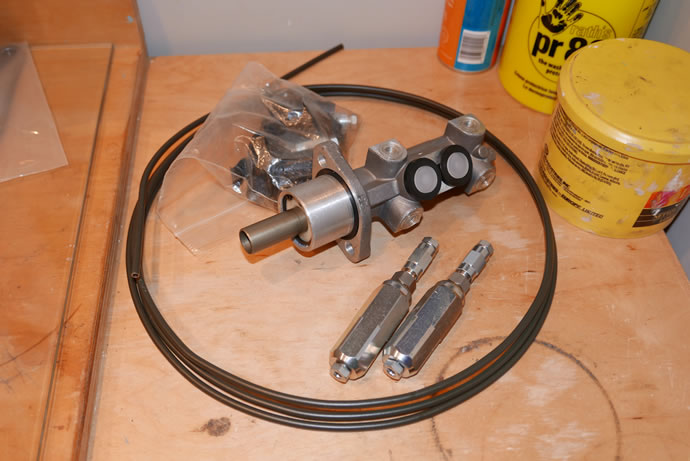
With the final painting complete I can now get on with planning and executing the fuel and brake system installation. Here is the booster and new aluminum 22mm master cylinder with a stainless bracket holding the Wilwood proportioning valve - August 17, 2014
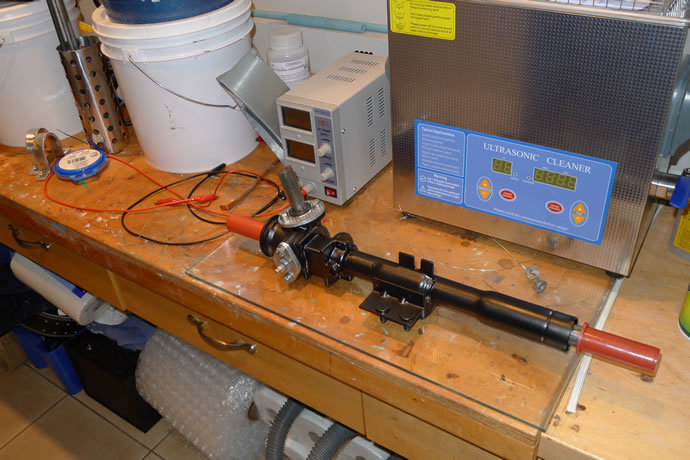
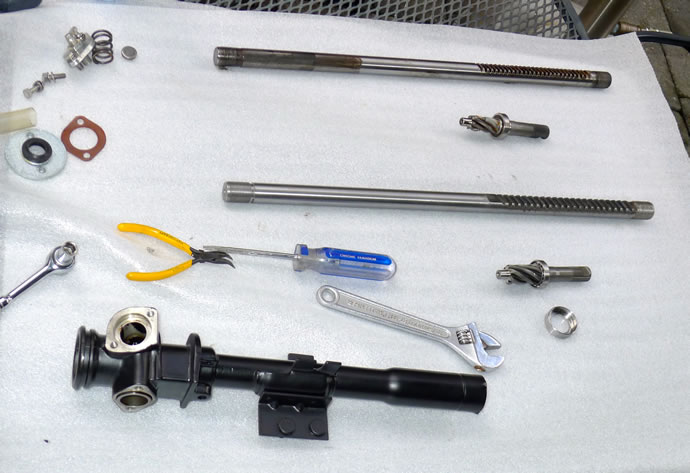
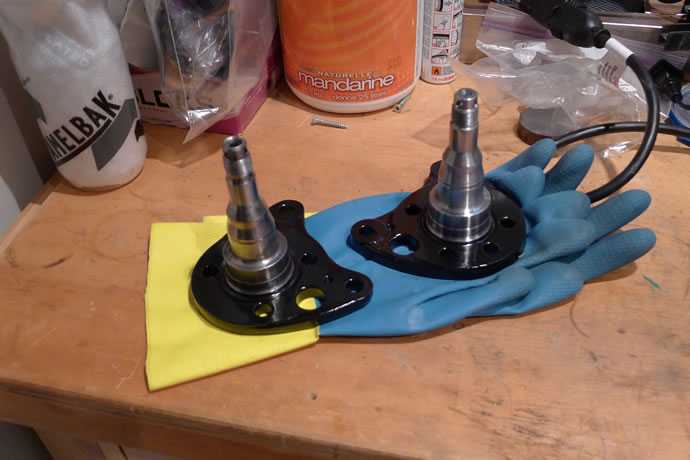
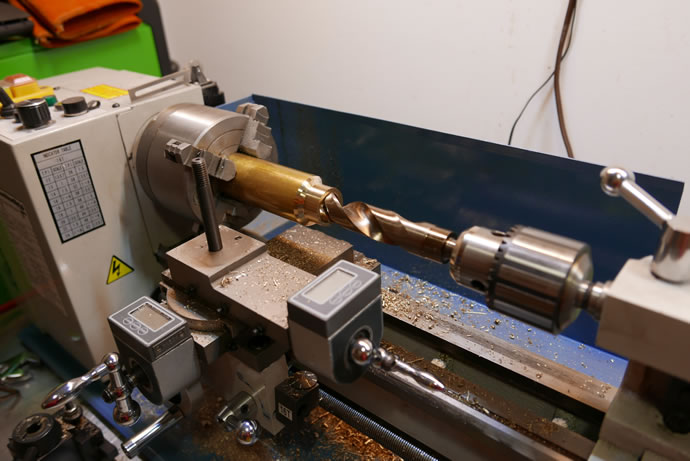
My Caswell Zinc-Cadnium plating system and my steering rack after re-plating the h/w and epoxy painting the housing (but before the installation of the new Quaife close ratio gear set which I am picking up in the UK on Sept 16th) - September 1, 2014
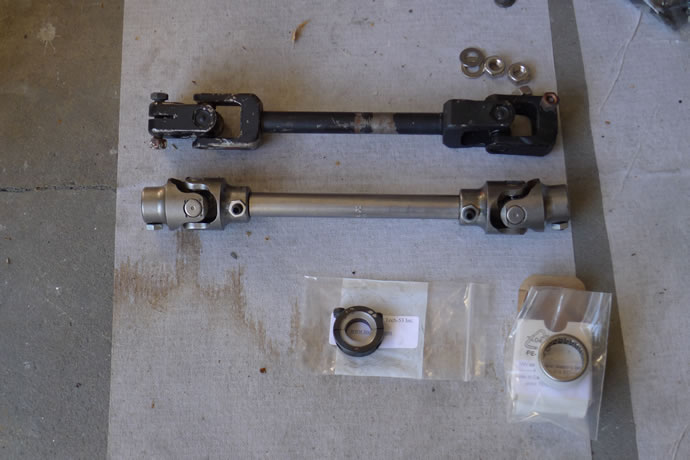
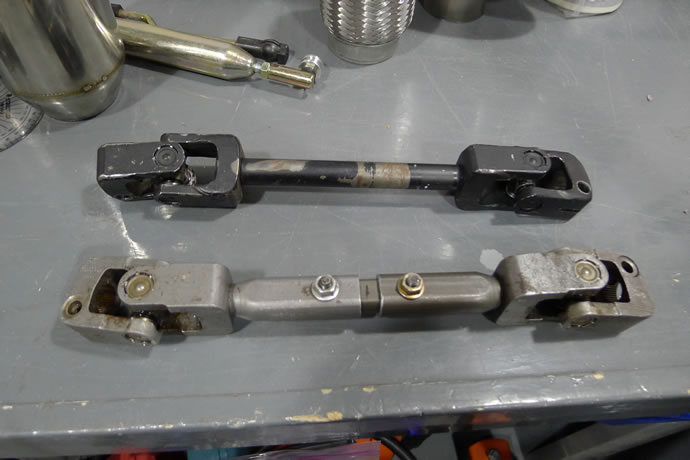
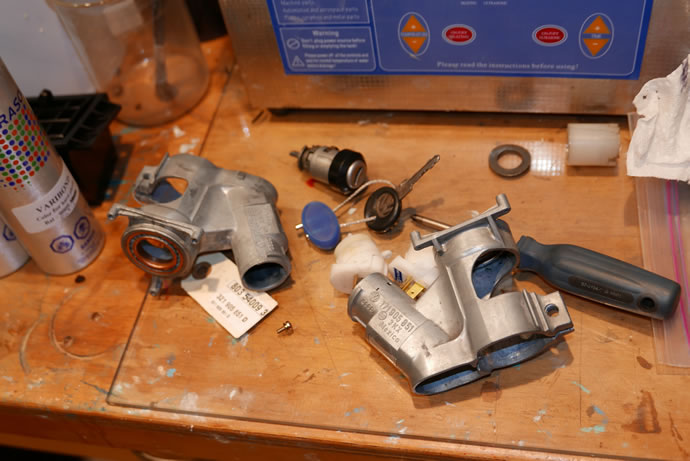
A comparison of the old (OEM) and (Borgeson) steering U joint assemblies, plus the new lower steering column bearing and bearing support bracket - September 8, 2014
After testing out the Borgeson u-joints I found that they did not have enough range of motion for the vw mk1 application. I am now sourcing mk3 u joints (one end has the 11/16" diameter 40 spine u joint so I hope to use them) - October 31, 2014
I have been running the 3/16" (4.75mm) brake lines all over the car this week but I ended up making some crappy looking flares with the manual flaring tool that I had sourced so I have now ordered a MasterCool hydraulic flaring tool to allow me to make OEM quality flares every time. There is nothing more annoying than spending 1/2 an hour making the perfect brake line and then messing it up with a poor flare end - September 14, 2014
Problems solved with my new Mastercool hydraulic flaring tool and brake lines are now complete (and wrapped in plastic to protect them from chassis rubbing). I also got the Quaife quick ratio steering rack installed, complete with a new bushing to provide zero play in the system - September 28, 2014
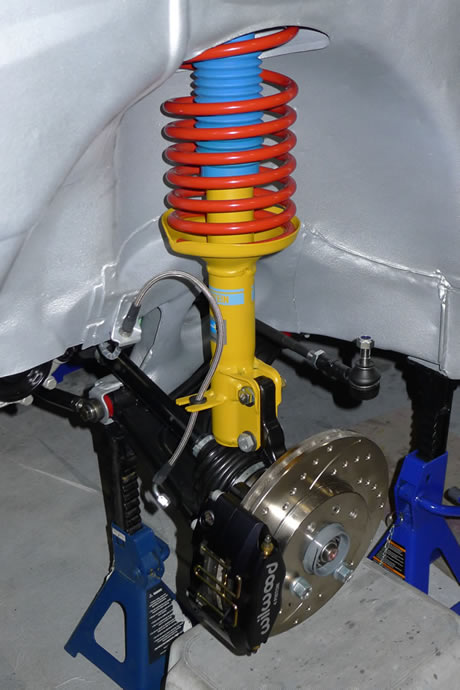
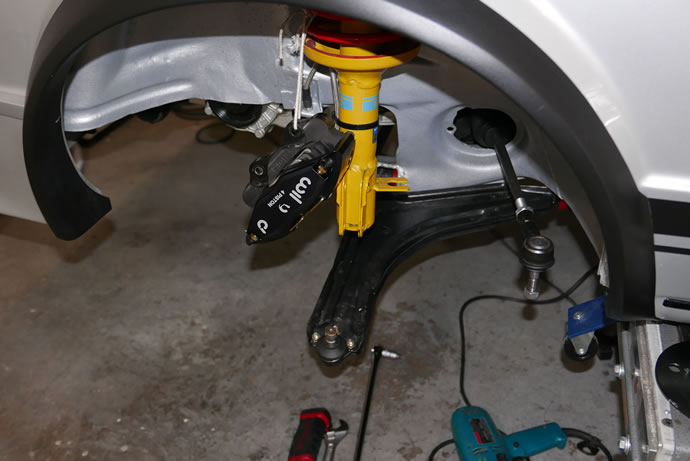
With the engine/trans installed everything else is coming together quickly now. I got the front suspension, front and rear brakes, CV/axles, test fitted, and sorted out missing h/w and such. I also worked on the exhaust system, starting to weld up a header support bracket and otherwise test fitting everything, and fiddled a lot with the steering system, realizing that the Borgeson u joints will not work so I am in the middle of attempting to fit some mk3 parts into place over the next week or so. If all goes well I should have all of the major mechanical systems completed by mid-Nov. I also got the fuel system lines final installed,which required the fabrication of some stainless brackets, and more -6AN SS lines/fittings. I am still waiting on a few hose ends but otherwise the fuel system is basically complete now. I am also in the middle of planning on how to bend my intake runners using some structural epoxy molding equipment and some low melting point metal to act as a 'mandrel' internal tube support when I put the bending forces on the tubes - this process will take most of the month to sort out as I don't want to screw it up and will have to practice a bit - November 2, 2014
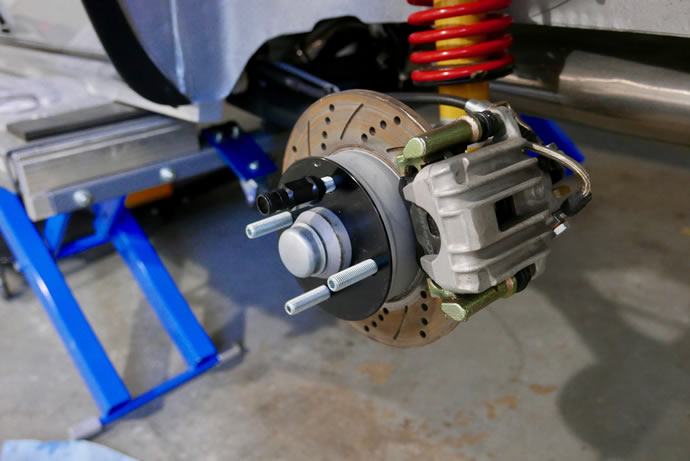
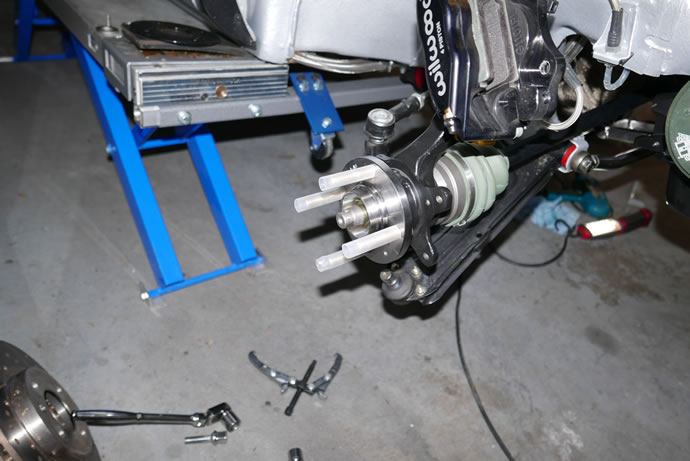
After accidentally throwing out the drum brake mounting h/w I had to source the hard to find M16x1.0 axle nuts and retaining washers again (from Jim Ellis VW), plus I sourced nicer/stronger class 12.9 mounting bolts so the rear disks are now complete. I will put on the wheels and measure clearance to the fenders, measure camber and toe, and then order custom axle/wheel spacers from Lella AutoSport to get the desired offset, camber and toe settings. Yes, these calipers are mounted 'upside down' but it turns out that the e-brake cables won't reach otherwise (different routing) so I will have to take them off and flip them over when-ever I bleed the rear lines (not a big deal) - November 11, 2014

Using a pair of vw mk3 p/n 1H0419955 steering shaft U joints (from the ZF steering rack end - 11/16" x 40 spline) to create a 'new' adjustable mk1 steering share U joint assembly (I made mine 8.5" long, 1/2" longer than stock as it fit better that way) - see the video on this for more info - November 15, 2014
Further update: after driving the car it is apparent that the U joints do need to be offset 90 degrees to avoid slight binding at specific steering angles - this requires that the U joint on one side be pounded off and re-pressed/spot-welded back together - September 6, 2016
When I upgraded to the larger 22mm master cylinder (to provide the additional volume of stroke required for the rear disk brakes) I needed to pair it with a later model brake servo/vacuum unit - the problem is that the later model servo has a different rod end. The original 83 GTI servo rod end is longer and has a fixed clevis. It is nicer to have an adjustable clevis so I am going to cut off the original clevis, thread it M10x1.5 and use a coupling M10 nut to mount it to the later model servo - November 23, 2014
I finished the design of the custom aluminum radiator, drew up the drawings and specs, and sent it off to Ron Davis Custom Radiators in AZ. It will be 11"x30"x2", tucked under the front cross member, with ORB o-ring type bungs that mate to ORB-to-AN fittings and then the lines (-20 for the water pump inlet, -16 and -12 for the cylinder head outlets, -10 for the heater core return, -6 for the expansion tank, plus a temperature sensor bung for the electric water pump) and I will be using 2 SPAL 10" medium performance fans with a puller shroud. I have mounting tabs on the top and ears on the sides of the bottom corners - it should work out nicely and provide lots and lots of cooling. I also have a Mocal inline oil-to-water heat exchanger with -20 water fittings and -8 oil fittings - I could not use the factory setup due to conflicts with the ITBs and this system is higher performance and also included a 200 degree F oil thermostat.
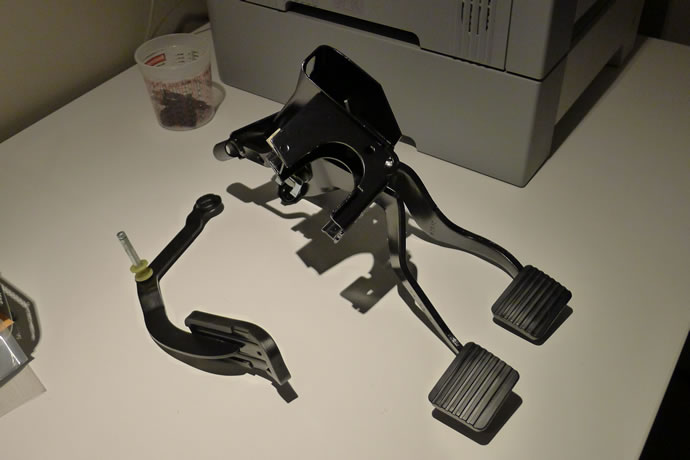
I did get the 1989 cab servo modded to accept the 83 GTI servo clevis by cutting off the GTI clevis end, turning it down on the lathe to 10mm diameter and then threading it. With the coupling nut I can now vary the length of the shaft to get the ideal pedal position. I also worked on assembling the clutch/brake/accel pedal assembly and decided that some nice 0.2mm thick 16mm ID 24mm OD stainless shims would remove the factory slop in the pedal assembly, removing the ability for the pedals to shift side to side. The plastic bushings were fine. I also sourced a brake pedal return spring from an 89 cab, complete with a nice plastic/rubber donut sleeve that slips over the 83 GTI pedal shaft and drilled a few holes for a bolt that allows me to adjust the spring tension to suit my tastes - there was no return spring in my car when I took it apart but the manual shows one and I feel that it is probably a smart idea to have one installed - and I do like the idea of being able to adjust the brake pedal spring ... - December 9, 2014

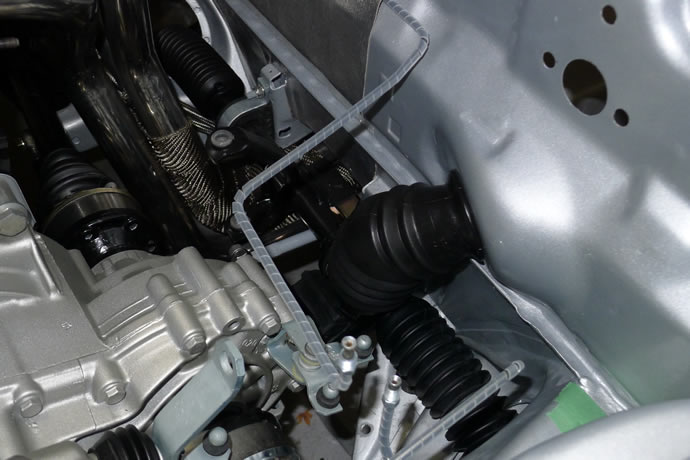
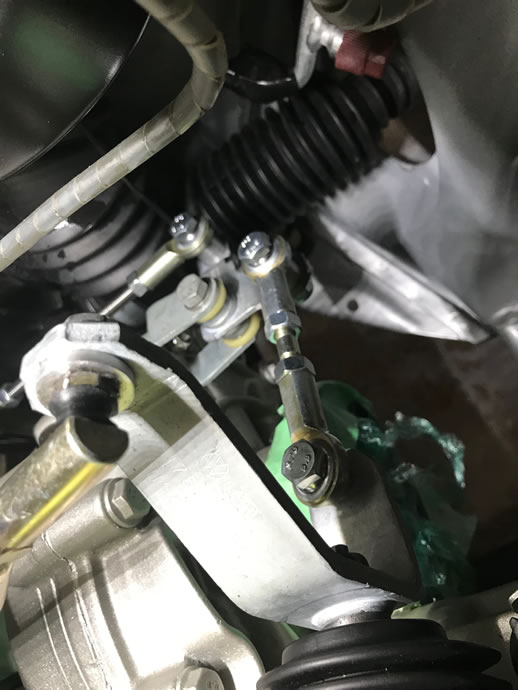
The U joints, steering rack and boots all in their final position/torqued ...
I should have all of the new intake runner components by Jan 1 so in the mean time I have been getting a lot of other things done:
I realized that once I have installed the brake servo I will no longer have access to the drivers side of of the steering rack so I took off the steering rack boots one last time, carefully centered the rack and then adjusted the tie-rods to the factory spec, and double checked that I had equal lock-to-lock distance with the steering wheel, etc. - good thing I check again as I was off by about 5mm on the tie-rod positions.
With the 16x24mm shims in hand I was able to shim out the pedal cluster and get it rock solid. With the 1/2x20 jam nuts I was able to use the brake pedal switch to align the brake pedal with the clutch pedal (which has fixed stops and therefore acts at the reference position). Once the servo was installed with the pedal cluster I used my new brake clevis adjustment coupling nut to maximum advantage and got the clevis to the exact position to not move the brake pedal out of alignment with the clutch pedal - awesome.
I then put in all of the final hardware and torqued down the servo, master cylinder and prop valve, and connected all of the brake lines. Since I had never completed the hard lines to the rear disks I fabricated those, and got the rear brake system completed as well. I will pick up my Castrol SRF Racing brake fluid this week and will then flush the lines and get the brake system completed next weekend ...
I also got shims for the accelerator pedal so that it was rock solid as well, and then measured and cut the new AT Power accelerator cable, and grafted on all of the required OEM parts to make the connection thru the firewall to the pedal (I ditched the foam grommet in the center of the accel pedal in favor of a hole in the top of the pedal with the accelerator cable running directly to it for a more positive feel/responsiveness.
Finally, I got the clutch cable installed. Boy that racing clutch is pretty stout feeling. Manageable, I think. I estimate that it is 30% stiffer than the brake pedal feels without brake fluid in the lines pressing on the servo diaphragm.
So the pedals and the shifter all work now. Pretty cool to be able to press all of the pedals and play with the shifter, moving into all of the gear positions. Vroom, vroom ... - December 15, 2014
I sourced some very sticky Hoosier A7 tires in 205/50-15 size (the A7s run 'out of the box' at lower temperatures than the A6s which need quite a bit of heat to work properly. Since I will be drag racing and auto slaloming my GTI the A7s are a better choice for me). THe A7s are mounted on Enkei racing rims (rims weigh 9.9lbs and the total wheel/tire combination weighs 27.3lbs vs 33.5lbs for the VW snowflakes and 185/60-14 tires). The total tire width of the A7s is almost 2" greater than the 185/60-14s and they barely fit with only 1/8" inside clearance to the shocks/springs/struts front/rear. I will use these tires at the track and to test the ultimate performance envelope of the GTI when it is completed. My suspension is a race setup with Bilstein race struts and shocks (p/n V36-0059 & B46-0657-H1) and H&R race springs (400lbs/in front and 285lbs/in rear) and it will be setup with only a moderate ride height drop in comparison to stock as I like 3/4" gaps to the wheel wells - and this will also allow me to fit these wide A7 tires without rubbing too much - May 12, 2015

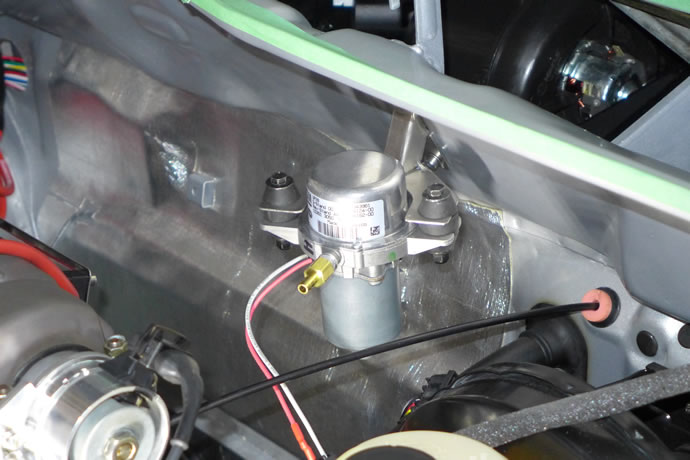
With my 288 race cams the idle manifold vacuum is only 30kPa/8" which is far less than the minimum required amount to operate the brake servo, so I have sourced a GM electric vac pump, an adjustable vac switch (so I can adjust the amount of vac 'assist' I want) and a check valve plus I TIG welded up a Tee connector that mounts into the servo unit and provides connections to the other components. I will weld a bracket to the underside of the front strut tower brace to support the unit - September 10, 2015

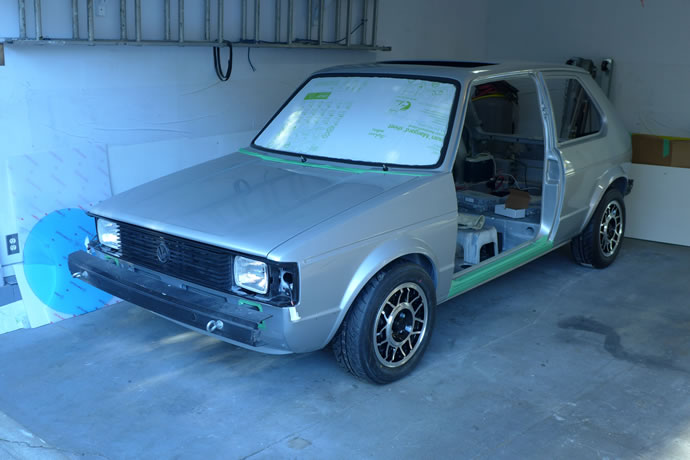
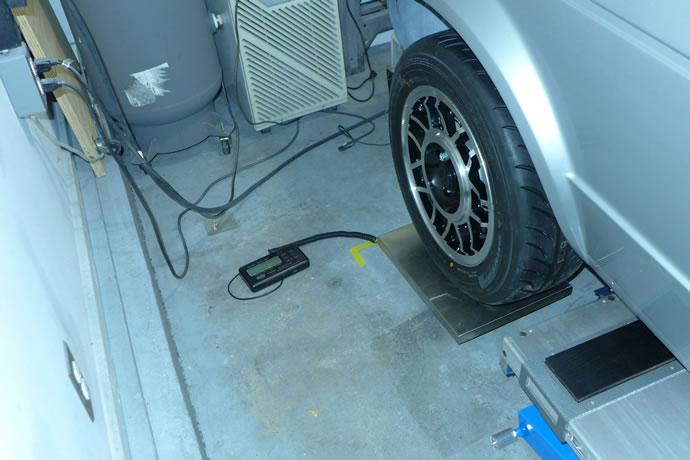
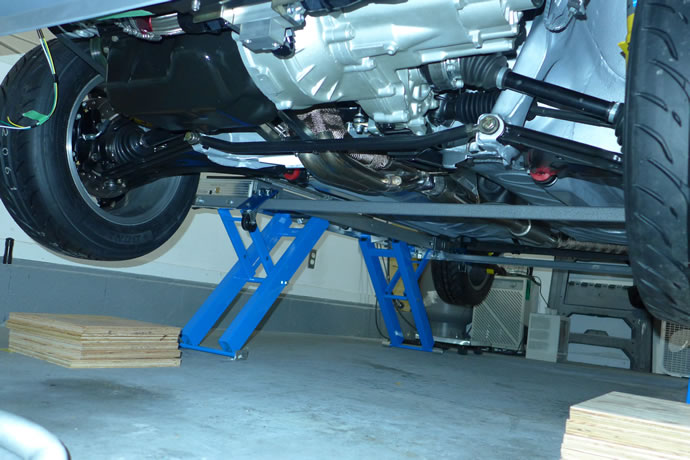
I completed the fabrication and installation of the A/C vents in the center of the dash, fabricated the mounts and modified the dash plastic to allow for the Holley digital dash unit, did the re-wiring to install the Lithium battery current monitor and alternator voltage regulation in ECU command, dismantled the car rotisserie, purchased and setup the EZcarlift, took the car out for its first drive down the lane and in the process damaged both the Wilwood brake callipers and VW Snowflake wheels, repaired all of the damage, did a 4 corner weighing of the car (1540lbs, 70/30 weight distribution) and calculated the approx final weight and distribution: 1800lbs and 66/34 distribution). A lot of progress - my back and hands are worn out and need a rest! - November 28, 2015
Taking the car out for its first test drive down the lane ...
Scaling each of the 4 corners ...
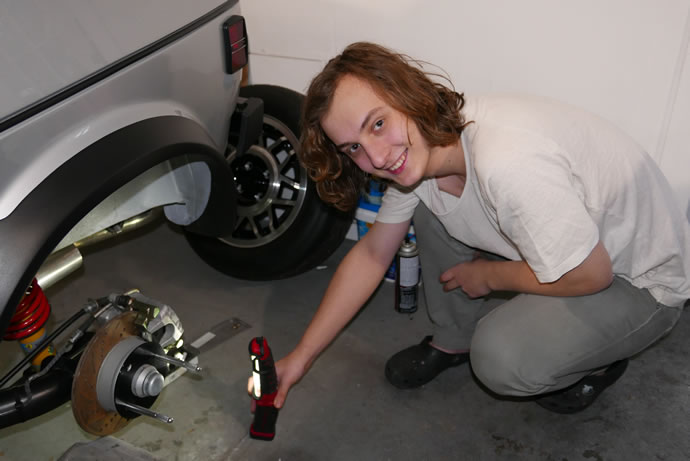
The new EZcarlift sure makes it easy to get under the car ...
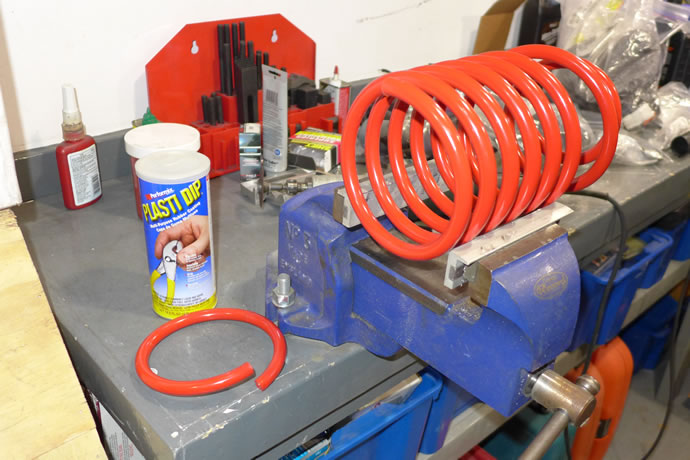
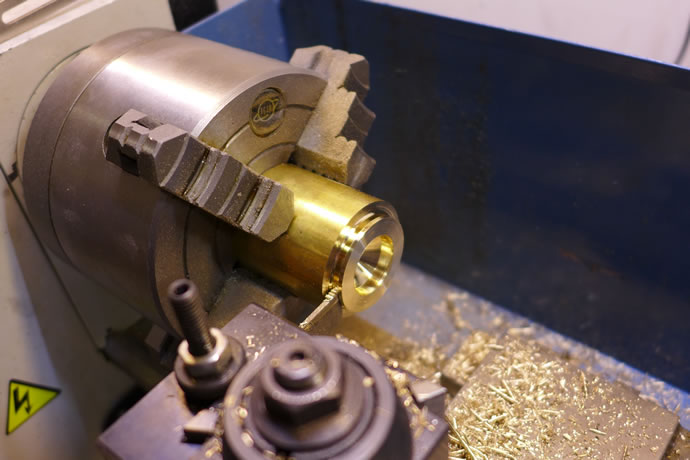
I cut the coils to set the correct ride height for the front and rear suspension, plasti-dipped the fresh-cut ends, put in a nylon washer in the top of the front strut bearings under the top nut and washer to take up some slight slack (to avoid the potential for rattling when the suspension is unloaded), confirmed proper ride height after lowering the car onto its wheels, did a basic front wheel alignment, determined that the problem with the steering 'clunk' when changing direction was related to the pinion gear moving up about 0.050" against the pinion gear cover, took apart the steering column, removed the U joints, pulled off the pinion cover, realized that there was really nothing under the cover to positively hold the pinion in place and keep it from moving up and down, machined the pinion cover to accept a friction fit brass shim/bearing surface, machined a matching brass shim of the correct thickness to eliminate the ability for the pinion gear to move vertically (without binding), pressed it into the cover, put the R&P back to together (not easy when the engine and brake servo are in the way), put the steering column back together, adjusted everything, verified that the pinion gear wasn't binding against my new shim but was snug, lowered the car onto its wheels and verified that the direction changing 'clunk' had been successfully eliminated when under load. I am very happy now as the steering is super responsive with the Quaife close-ratio R&P, and that the system has zero play in it and is smooth and very precise now :) - December 1, 2015
1-1/4" gap now to the fenders (will be 1" when car is fully weighed down) ...
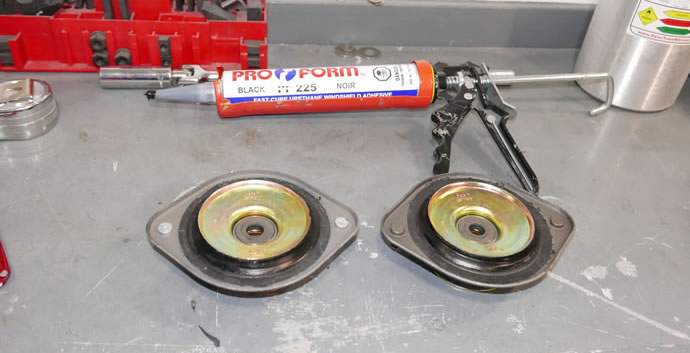
Using windshield urethane compound to strengthen/stiffen the Febi HD upper strut mounts ...
Machining the new pinion brass shim ...
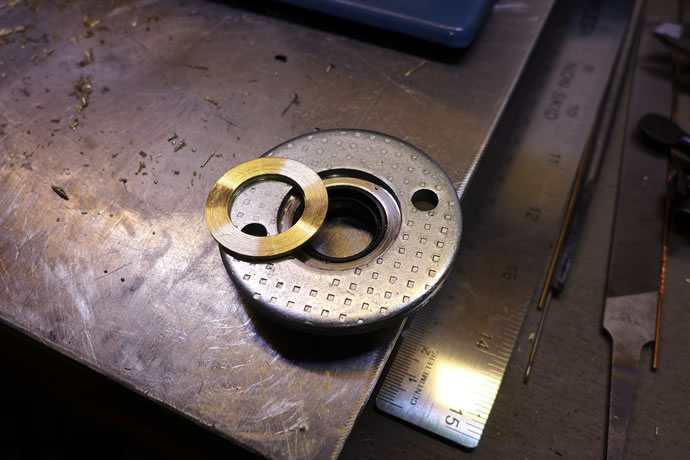
The finished result: a nice press-fit of the shim into the machined pinion cover ...
I had to re-route the rear brake lines to solve an interference fit with the 14" VW Snowflake wheels, plus solve a repeat brake fluid leak from one of the master cylinder to rear proportioning vale lines by making and installing a new metric bubble flare to SAE inverted flare line. After flushing the system again the brakes are solid and there are no more fluid leaks!
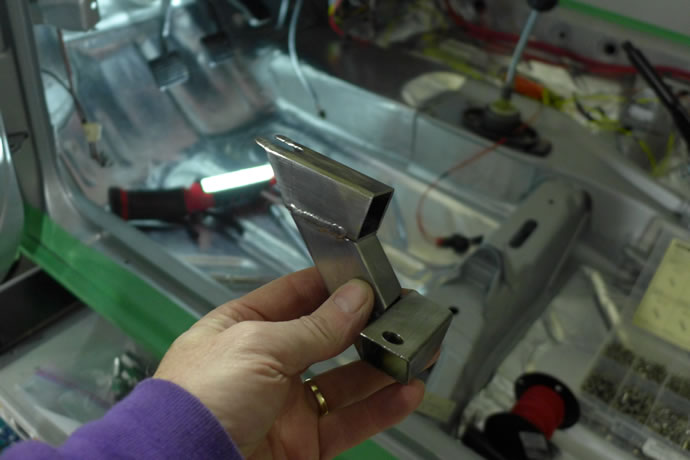
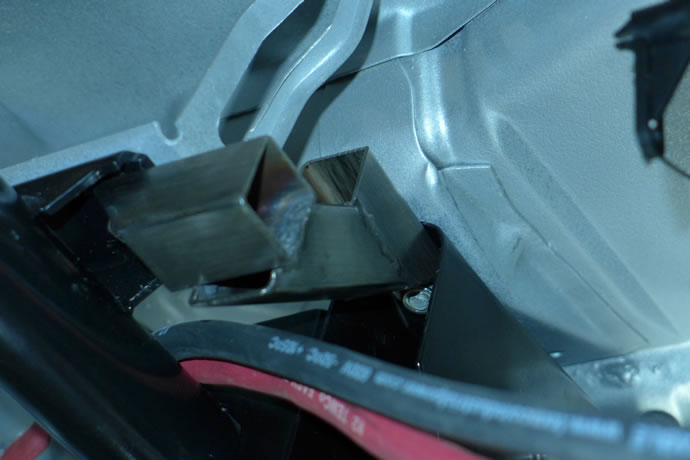
I decided to mount the GM brake vacuum servo pump on its rubber vibration isolator mounts to a custom stainless steel bracket that I made up and attached to the rain tray holes that originally held the ignition coil. I ran some tests using an adjustable vacuum switch to prove that the brake pressure could be electronically controlled. I then ordered another GM/Holley MAP sensor so that my engine ECU can be used as a master controller of the brake assist vacuum - using a potentiometer that I can turn as I drive I will be able to adjust the brake pedal pressure at will now.
I also received my digital level and Longacre steering toe measurement plates and did a full front/rear alignment (front: 1/8" toe out, -1.3 degrees camber; rear 1/8" tow in, -1.0 degrees camber) and I installed the 3mm spacers for the front wheels and ordered 15mm spacers for the rear axle/brake assemblies, plus matching 40mm 12.9 grade M10x1.5 Allen bolts. I also ordered new longer wheel lugs (M12x1.5x25 and M12x1.5x30 R13 ball seat) for the VW snowflake wheels and an additional set of matching 60 degree conical seat lugs for my lightweight Enkie Racing RP01 wheels and Hoosier racing slicks - December 11, 2015
I built a stainless brace/bracket that triangulates the steering column lower mounting point to the brake assembly/vehicle frame and it has removed about 80% of the flex inherent in the OEM design. I also machined a collar for the top of the steering column that keeps it in place and eliminates any up/down movement. I think I am finished 'tuning' the steering system now - I hope that it will be nice and crisp/precise when driving on the road ... - December 25, 2015
For the last few weeks I have been working on the rear wiring and lights, starting by building a new rear wiring harness with all new connectors and LED lights (see prior posts for p/ns), plus I worked on coloring the Hella replacement tail light assemblies to be a hybrid of a US and Euro Spec look to them (I am also building aluminum/carbon fiber bumpers that will be a hybrid of US and Euro Spec look to them - shaped like the US bumpers but scaled a bit smaller and closer to the body). I got the powered radio antenna installed in the back, plus sorted out the backup camera mounting and wiring, although I blew up the camera by connecting it to 12V when it needed 3.3V. I also got the 12.9 grade rear axle mounting bolts installed with the Lella AutoSport 15mm spacers - January 17, 2016

I received my p/n 191501639A rear axle bearing dust shields and they fit - January 24, 2016
I machined up a smaller upper steering column collar, and installed it along with a new top column bearing assembly and ignition switch - May 20, 2016
I ordered a VW mk3 non-ABS brake servo/booster because I had been using a leaky mk1 servo unit. I experimented with some shims between it and the master cylinder (which is a 22.2mm unit, also a mk3) and initially took up too much of the slack and had the car self braking! But with a single 12mm stainless washer as a shim it reduced pedal travel and now the brakes are feeling pretty good. I have the ability to electronically set the amount of vacuum assist so I have been trying out various settings.
One problem I still have with these much improved brakes (using Wilwood 4 piston calipers and 10.1" disks up front and mk3 disks on the back with a Wilwood proportioning valve) is that even with the valve on full minimum I still get rear lockup first. I am ordering fixed in-line pressure reduction valves to try out (I will leave the adjustable valve in the circuit) plus I am going to order a 25.4mm master cylinder which will reduce pedal travel another 30% (but also increase effort by the same ratio) - ideally I would like to heal and toe with minimal pedal travel and I can simply crank up the vacuum assist if I want a softer effort ... - December 6, 2016
I have been fooling around with my braking system, trying to set my rear brake line pressure to the correct level to avoid rear-first lockup conditions without success, and it didn't make any sense to me as I have a Wilwood adjustable proportioning valve in the system. I also wanted to explore ways to continue to improve the responsiveness of the brake pedal - to have it activate as quickly as possible with the minimum brake pedal travel, so I also sourced a 25.4mm master cylinder to swap in replacement of my current 22.2mm MC. This would have the net effect of reducing pedal travel 30% while increasing pedal effort by the same ratio, and since I already prefer running my brake servo vacuum at 50-70% of maximum available vac I can do the swap and maintain the same pedal effort by simply turning up the vacuum (I have an electric vac pump under ECU software control so this is easy to adjust on the fly in the car - I have a panel dial that I can simply turn).
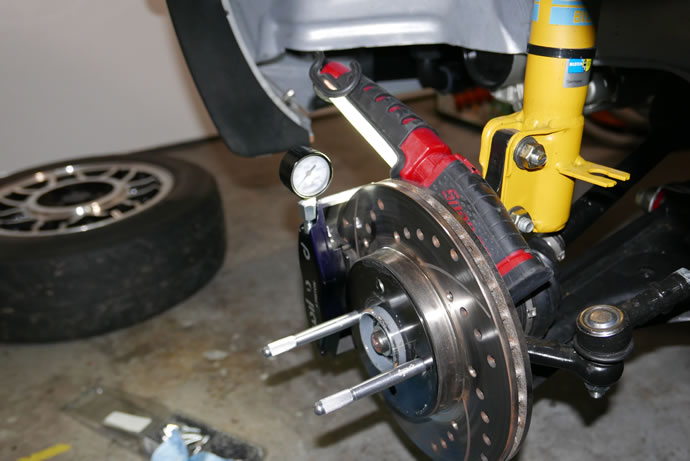
Anyway, I sourced a 3,000psi line pressure gauge with the appropriate adapter fittings to screw into the blanked-off MC ports front/rear and also the bleeder valve ports on the front and rear disk callipers. I first tested the MC and both circuits showed 750psi without servo vac and 1500-1600psi with max vac. Note, I have a custom brake line setup with 1 circuit to the front and another to the rear to accommodate my proportioning valve - similar to many US spec cars.
Next I tested the line pressures at the front callipers and again saw the same 750-1,500psi range. Finally on the rears I saw 500psi at minimum prop valve setting and 1,500psi at full prop valve setting - the surprise was that I realized I had been turning the prop valve in the wrong direction when doing panic brake stop tests.
By reference the factory test settings for VW mk1-mk4 cars is around 1,500psi max for the fronts and 510psi for drum rears and a bit less (around 490psi) for rear disks, depending on the car. The front/rear bias ratio will depend on a lot of factors - the weight bias of the car front/rear, most importantly while under panic braking, and then the type of front and rear callipers or drums - how much fluid volume is required to move the pistons - the piston area x # of pistons will determine the total force applied to the rotors.
In my case I have upgraded to Wilwood 4 piston callipers so the volume of fluid that needs to be moved to get to maximum braking pressure is much higher than for a stock single piston calliper. I didn't do all of the calculations but I think that the 22.2mm MC is a bit small for the Wilwoods and also that the rear bias needs to be fairly low, in the 550psi range.
I'll wait for the ice and snow to melt (Hopefully later in January) and will get back out for some more panic stops with the current 22.2mm MC before swapping it out for the 25.4mm MC - January 2, 2017
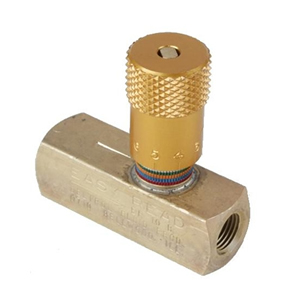
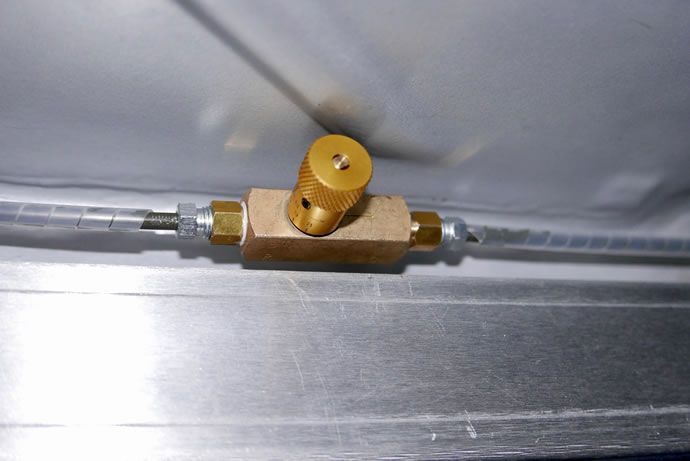
After doing some more reading about the Wilwood proportioning valves I now understand that when they state 100-1000psi adjustment range they are not telling the whole story - their valves can only reduce the rear brake pressure to 57% of the fronts so if the fronts are 1000psi the rears will be 570psi. I did measure around 500-550psi at the rears during the testing above with the line pressure gauges installed but with the extreme front weight bias of my FWD GTI and my grippy rear disks/pads I may need to go lower still - as low as 400psi, so I have sourced a really tiny and cool little prop valve that can lower the pressure all the way to zero if needed and I will put it inline with the rear circuit so I can reduce the pressure even more if I need to. Once I go to the effort of swapping in the 25.4mm master cylinder I don't want to have to re-bleed the brakes yet again if I still experience rear lock-up ... better to take this additional step now while everything is apart - February 7, 2017
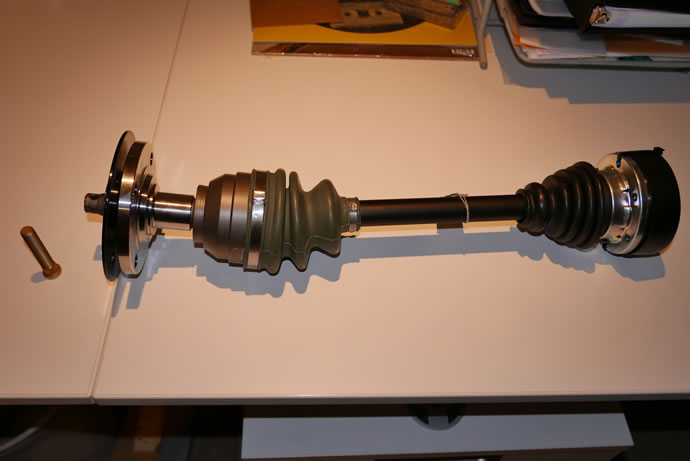
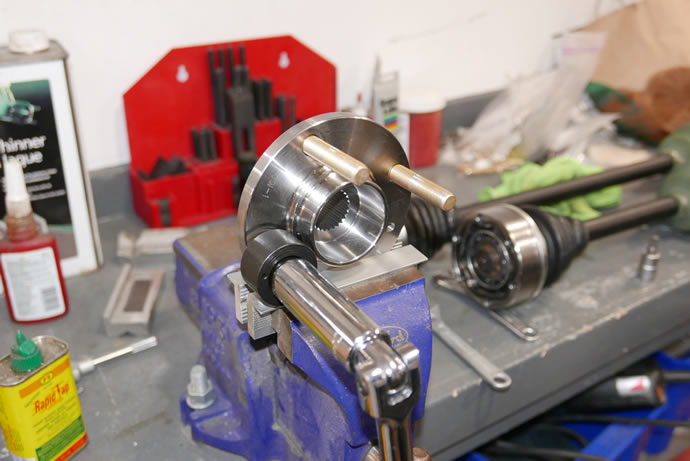
Josh had proudly sourced some OEM German axle assemblies for me but I found that they had some free-play in them which resulted in a bit of 'slap' when going on/off the throttle as that slack was taken up. Rotating the wheels about 1/4" was the total amount of movement but it was enough to make driving a bit annoying at times when feathering the throttle in city traffic. One theory is that I was using the brakes to load the engine when it was initially fired up on jack stands and the axles weren't totally level, causing the power to be transmitted thru the CV joints at an angle - that may have stressed them and worn them? Anyway, I ordered some expensive 500hp rated racing axle assemblies from The Driveshaft Shop in NC and they are superb quality, using CVs that are 40% larger with all components upgraded end to end. There is no free-play in these assemblies so I look forward to installing them soon - February 7, 2017
I finished the installation of the 3-axis accelerometer in the car and then did a fine tuning of the calibration in software on the ECU such that the sensors now read accurately to less than +/-0.005g for acceleration, and around +/-0.01-0.02g for braking and corning. I still need to confirm that vibration and electrical noise from the ignition system won't reducing the accuracy, but if noise is added to the signal I can always run a smoothing function in the ECU diagnostics and effectively cut out the noise.
I installed the 25.4mm master cylinder and adjusted the brake pedal linkage, adding back one spacer (for a total of 2) between the servo and MC, and setting the pedal position such that the MC engages immediately within the first 1/10" of foot pedal travel. I also installed the mini proportioning valve in series with the existing Wilwood prop valve and then ran system brake pressure tests. It turns out that I had originally installed and set the Wilwood prop valve correctly as re-testing this weekend proved that even when set at the minimum setting, about 550-600psi of rear pressure is still present when the front pressure is 1000-1500psi (which explains why I was experiencing rear lockup).
With the 25.4mm MC replacing the 22.2mm MC, the brake pedal travel is indeed 30% shorter and the force required to stop at a given rate is also 30% higher as expected. The reason for swapping MCs was done mainly to avoid having the pedal travel too far, making heal-and-toe braking into corners for downshifting purposes almost impossible - too much pedal travel puts the right foot at a sharp angle to the throttle making it way too easy to excessively rev the engine. Having 4 piston callipers up front takes more fluid volume to operate, causing the MC piston to travel further, etc., hence the preference for the new 25.4mm MC. And since I had previously decided that I liked less servo vacuum for a firmer pedal feel, all I needed to do to get back to the same pedal feel was to turn up the servo vac 30% and all is well.
The new mini prop valve (Deltrol p/n 10120-40, Speedway p/n 910-31357) allows the rear pressure to be reduced all the way to zero if desired (for RWD burnout competitions this is what people want) so I was sure it would help me with my problem and it did work as expected. With the valve 80% turn off I got to a max pressure of 500psi and it ramps to that pressure over approx 1s so it has a damping effect on the rear pressure when the pedal is pressed which is actually not a terrible thing - if the prop valve is adjusted to the threshold of rear lockup this will soften the effect and reduce the tendency for a sudden change in direction (i.e. the rear of the car swinging wildly around to the front).
I also installed Wilwood E type pads on the front which have about 20% higher coefficient of friction than the previous BP10 type pads - so once they are warmed up to around 250-300 degrees F the fronts will have more braking sensitively than before which may allow me to adjust the rear pressure up higher. When I am doing lots of track laps I will switch to BP20 pads which have the greatest coefficient of friction at temperatures above 800-1000 degrees F and again, I may be able to dial up the rear pressure more again. The idea is to have the rear brakes do as much work as possible to off-load the work the fronts have to do.
I will be switching to the new front racing axles soon which require extended length racing type studs so I went ahead and installed extended length studs in the rear allong with the new Gorilla open backed 'tuner' nuts which are required when running extended length studs - I also had to use conical to ball seat adapters as the 'tuner' nuts are not generally available with conical seats - and I already have to run conical h/w for my Enkie/Hoosier racing wheels and slicks. I think they look decent enough on the OEM VW Snowflakes and they sure are a lot easier to mount/dismount than the OEM bolt system too.
The snow and salt should be washed away by rain over the next week and I may then have a chance to do some road testing to confirm that I didn't add too many spacers between the servo and MC (last time I had 3 spacers and after a few minutes of driving the car started to self brake - likely caused by the brake system warming up and expanding a bit (my tolerances were too tight/aggressive) - February 13, 2017
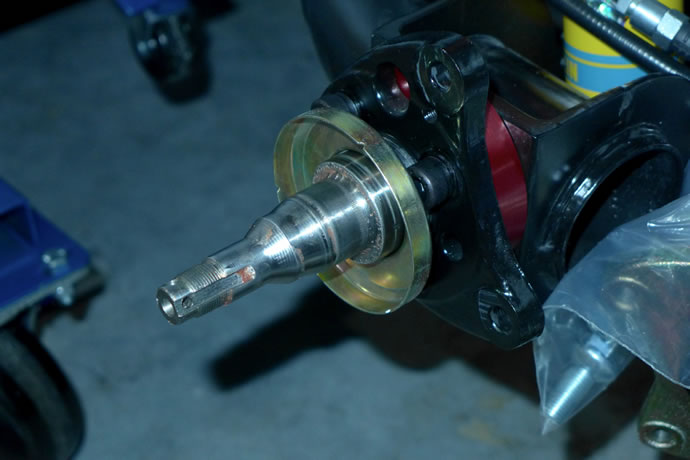
I got the OEM axles pulled out and installed the new 500hp rated axles but it was a ton of work: first the spindles/hubs needed to be pulled apart so the new hubs (larger splines and shaft, 32mm nuts, etc.) could be pressed in with fresh bearings, then I over-extended the axle angles when installing them and had to re-build the inner CV joint on one side as the ball bearings had fallen out, then the inner cer-clip on one side was binding against the axle so it all had to pulled out yet again, and finally it all went back together successfully.
After driving around with the new axles I can say that they definitely have tighter tolerances so all I am now left with is a bit of that on-off-on throttle free play from the limited slip diferential that I will simply have to live with - it is only noticeable during slow city driving in heavy traffic. That diff also whines a bit in comparison to the OEM unit - but I don't really notice the increase in mechanical noise much.
The new 25.4mm master cylinder setup feels great - more pedal effort required but the pedal travel is now minimal so heel-and-toe downshifting will be much easier to do - and I simply like a stiffer brake pedal anyways. I just crank up the electric ECU controlled servo vacuum when I want an easier braking effort. The 2nd in-line proportioning valve has indeed solved my front-rear brake balance problem. Panic stops result in straight line skids now. I will wait for warmer weather with cleaner streets before fine tuning the balance setting (too much salt and sand dust still on the roads).
I did have to back off somewhat on my brake pedal preload - I have a custom linkage that allows me to set the servo/MC preload to reduce pedal travel but I was at the point where there was a bit of self braking once the system was fully warmed up - backing off the brake pedal 1/4" solved that problem and now there is a softer initial brake response for the first 1/4-1/2" of travel which is actually a good thing. I am very happy with the end result - February 27, 2017
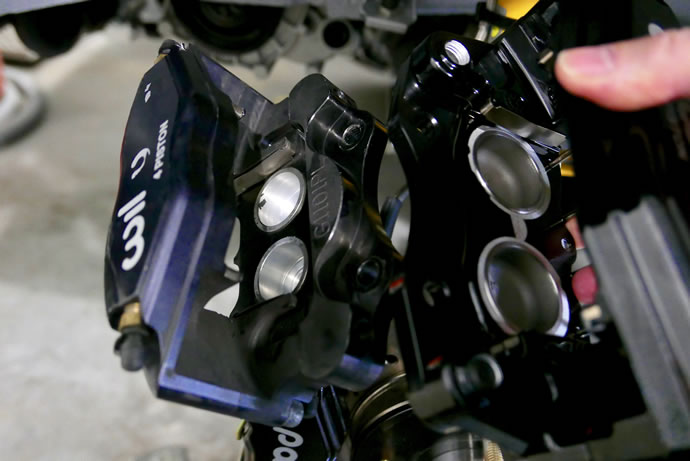
After further thought I have decided to purchase the unique Tech-53 callipers (made specifically for Tech-53 by Wilwood) and replace my standard-issue Wilwood Powerlites as the Tech-53s have 68% larger piston area, which will vasty increase my stopping power relative to brake pedal force, and more importantly will improve my front/rear circuit bias such that I can run without the 2nd proportioning valve.
After a long discussion with Fred, the owner of Tech-53, about my brake bias issues, pedal pressure requirements for a panic stop, etc. it became very clear that my Wilwood PowerLite 4x1.25" piston callipers were undersized relative to the task at hand - in fact they are only 15% larger in total area than the stock single piston callipers so they don't effectively shift enough of the brake bias forward to avoid premature rear wheel lockup.
Fred is an aerospace engineer who has put in a lot of time into thinking about the lack of properly spec'd 4 piston callipers that are available for mk1 and mk2 cars so he went about negotiating a deal with Wilwood to have some large piston callipers custom made to his specs. They use 1.625" diameter pistons vs the 1.25" diameter pistons in my Wilwood Powerlite callipers, thereby providing 68% more clamping pressure (and therefore braking torque) - and that means that for a given brake pedal pressure the car will stop 68% faster - up to the limit of the tires, with minimal increase in pedal travel. Since I have a huge, race oriented 25.4mm master cylinder, pedal travel and feel will not be negatively impacted. Fred says the 23.8mm MCs are an ideal street match to his callipers and that 25.4mm MCs are awesome on the track - since I like a stiff brake pedal I am pretty sure I'll like the feel on the street as well, given that I am already pretty happy with the way my existing system feels.
Fred also pointed out that the G4 rear aluminum callipers are 2mm larger than the steel G1-3 callipers (38 vs 36mm) so that aggravates the premature rear lockup issue. I am confident that I will be able to eliminate my 2nd proportioning valve now and also be able to dial back the Wilwood valve to reduce the time delay effect in rear circuit pressure build-up.
I have completed a brake conversion table with all of the common after market setups (brake torque, front-rear bias, etc.).
My excel spreadsheet analysis can be found here: http://www.derekspratt.com/Misc/VW_Mk1_Big_Brake_Conversion_Analysis.xlsx
- March 7, 2017
We still have winter conditions in the Pacific Northwest for the most part, but there are the occasional days when the sun is out and temperatures are up enough to do some driving/testing. The roads still have a lot of sand on them so traction is limited and the sand gets into the brake system as well ...
My first attempt at driving around the block with the new big piston Tech-53 callipers was cut short by some nasty sounds coming from the front wheel area. I had obviously checked the clearances so I was puzzled about what the sounds were. My inspection found that the control arm ball joints were lose - the 'grade 8.8' bolts were actually stripped and so the ball-joints were barely being held in place. Yikes! It turns out that the crap bolts were imported junk and are now being replaced with OEM/German grade 10.9 h/w. Double-check the h/w on any aftermarket control arm/ball joint combination products that you may purchase ...
Another area where cornering noise was coming from was due to the new CV boots sticking/rubbing each of the folds against each other - by 'lubricating' them with rubber care treatment they became quiet as well. Finally, sand was getting into the brakes causing some intermittent scraping sounds (I don't use OEM dust shields to help cool the rotors on the track).
With all of those gremlins out of the way I was able to do some braking tests: the Tech-53s take about 1" more travel, which makes sense, as the volume of fluid required to push those big pistons is greater, but the force required is a lot less, making the brakes feel very responsive and powerful, which is what I was hoping for. I will look into adjusting the brake pedal linkage again, putting a bit of pre-load on the system - and double-checking that I am not over doing it as in prior attempts to reduce pedal travel. With the large 25.4mm master cylinder paired to these Tech-53 callipers the pedal feel and travel are close to ideal now. The biggest area of improvement comes from re-balancing the front/rear braking bias - I have now fully opened up the 2nd proportioning valve and panic stops in the rain did not cause pre-mature rear wheel lockup so all is well. I will start to back off the reduction setting in the main Wilwood proportioning valve next ...
I need more time to drive in dry conditions, which I should be getting by the end of the weekend so stay tuned for more commentary on this new braking system. I am all smiles for now - March 13, 2017
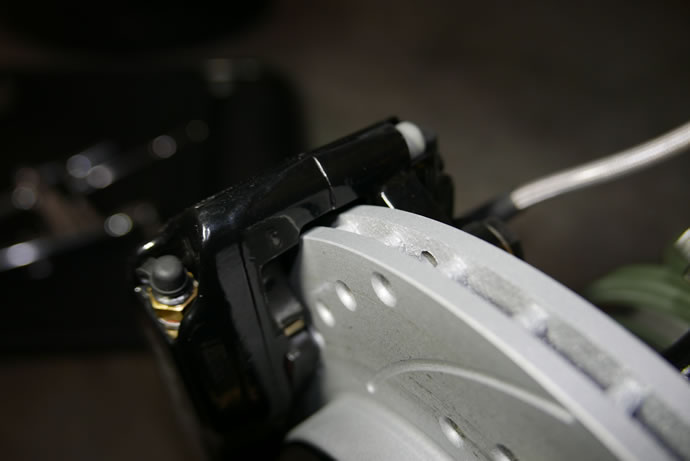
After tracking down the grinding noises from the front end while testing the system I noticed that the clearance from the outside edge of the rotor to the inside surface of the calliper was minimal on the driver side and there was evidence of some minor contact. I was able to loosen and move the calliper to gain more clearance but decided that for racing thermal expansion purposes that I would increase the gap from 0.020" to 0.070" by milling the rotor down from 10.1" to 10.0" - this still left enough surface area for 100% brake pad contact so there will be no reduction in braking performance. I also had some minor contact between the outside edges of the callipers and the inside surfaces of the 14x6" OEM Snowflake wheels so I have swapped out the 3mm spacers for 5mm spacers.
After bedding the new pads the brake feel from this new Tech-53 big 4 piston calliper system is incredible. I did some brake pedal linkage adjustments such that the pads contact the rotors when there is less than 1/4" of pedal travel so the brakes are now very responsive. I believe that these callipers are a huge advance in mk1/mk2 brake performance/feel and certainly address the prior issue of front/rear system bias - I have not backed off the proportioning valve but will do so later today and do some more testing. Even with the valve at its current setting the car stops urgently with only moderate brake pedal pressure. I also think that the 25.4mm master cylinder is an ideal match to these Tech-53 callipers.
With the prop valve backed off 2 full turns I was able to get all 4 tires to enter a skid condition together at the same time. Max braking deceleration was almost 1.1g with the street R-compound Bridgestone Direzza-II 185/60-14 tires (when the air and road temperatures were only 50 degrees F) so this little bunny is stopping with the best of them now! - March 20, 2017
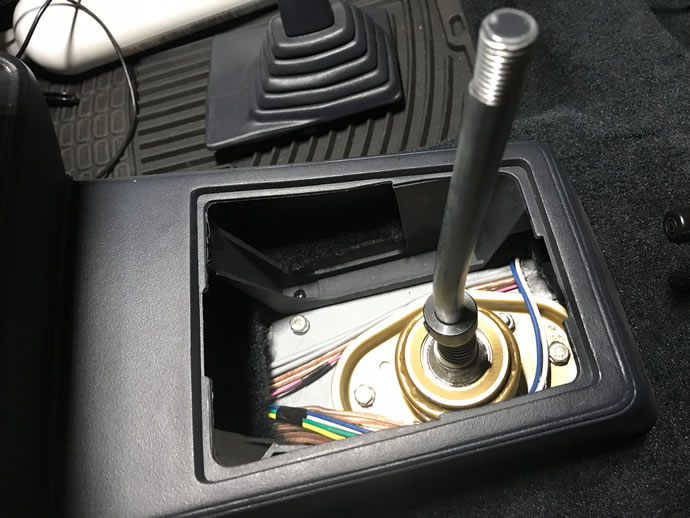
Installing the new USRT and SCCH shifter components ...
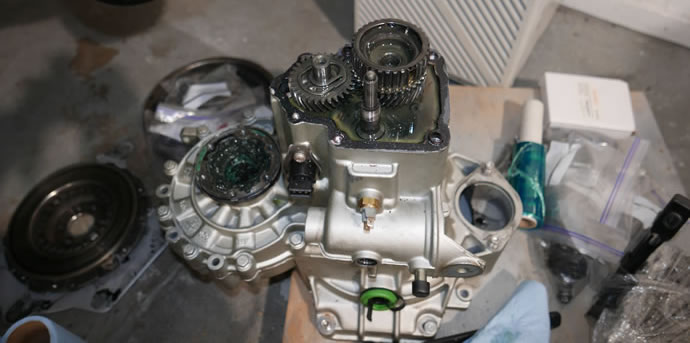
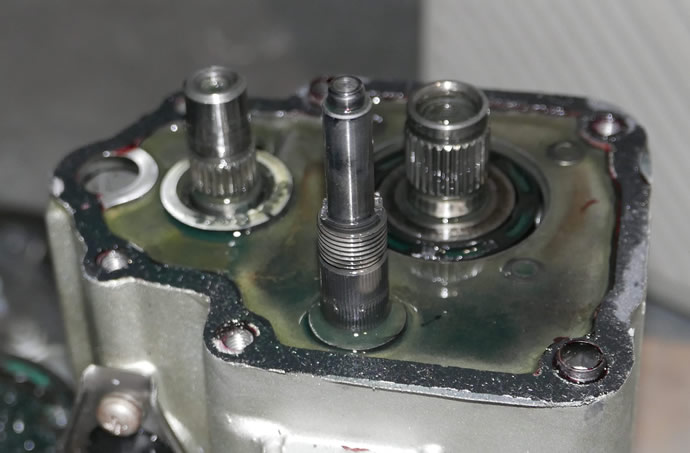
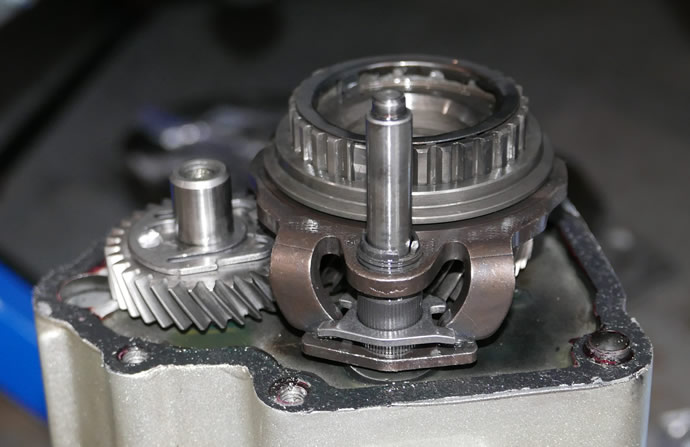
Swapping out the 5th gear on the 020 transmission
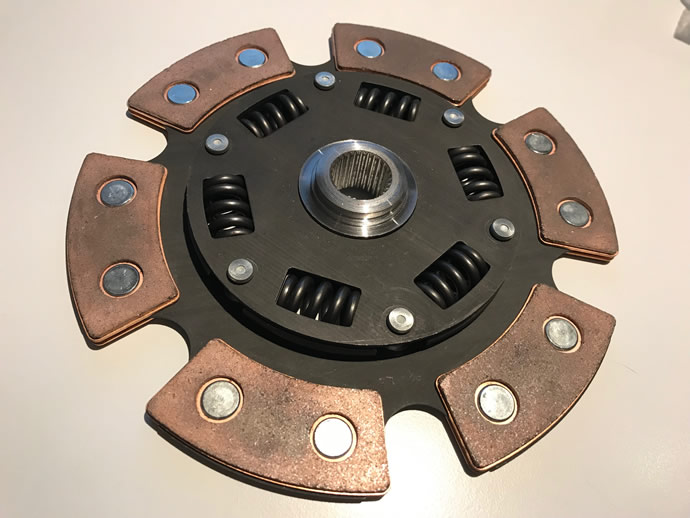
The new California Clutch stage 5 plate (hopefully this will not be too agressive for street use - the old clutch was a stage 3 unit w/o springs)
Success! The California Clutch stage 5 clutch and pressure plate assembly was balanced and then installed on the engine, the transmission with it’s new 0.76:1 5th gear set was bolted on, and the combined assembly was lifted into place and bolted back into the chassis using slightly modified BlackForest Industries engine/trans mounts. Then the custom radiator was installed, the rebuilt cylinder heads, and finally all of the sensors and lines and exhaust system ... after priming the oiling system with my custom drill mounted oil pump drive I fired it up 3 times, each time increasing the max temp from 120 degrees F, to 140 then to 175 degrees, with a full cool-down between runs. The plugs were pulled and inspected and they were 'as new'/shiny.
Leakdown tests were performed after assembly (5-9%), after the oil priming and starter driven cycling (5-7%), and after all 3 test fires – a total of 10 minutes of run time (3.5-4.5%). So the engine is working really well: no blue smoke, no smell, no fouling, no oil leaks, all good!
I installed a USRT shifter linkage system and test fitted a SCCH shifter (since removed and sent back to Jacob to hopefully get it to feel less stiff). I also got the fender flares repaired and re-painted with plastic paint and then a top coat of plasti-dip satin black which looks really nice. Finally, I machined down the front strut bearing inner sleeves to reduce the slack in the bearing but leaving what I hope is enough tolerance for the control arm movement - April 8, 2019
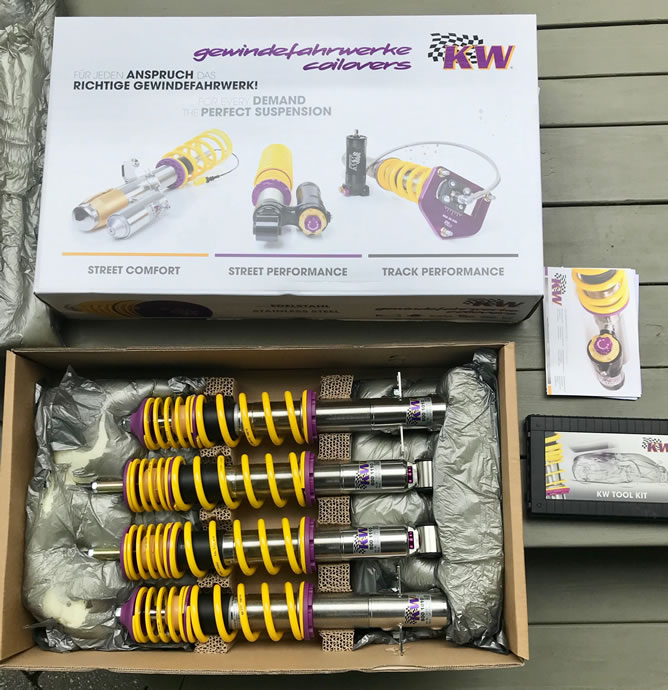
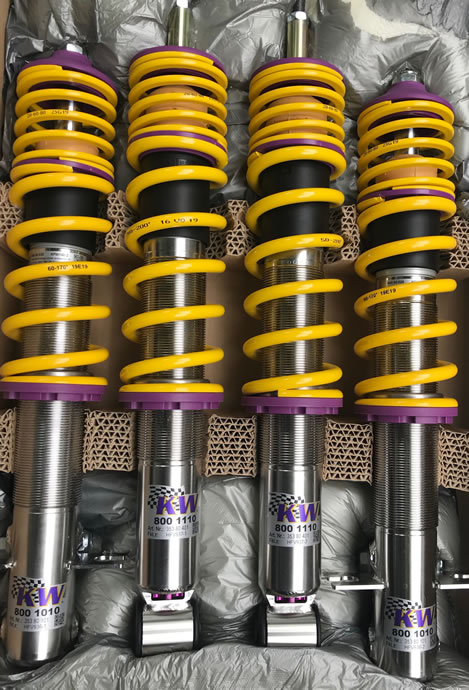
After a 9 week lead time wait my KW Variant 3 p/n 35280001 dual-adjustable struts and shocks arrived from Germany (these days no-one stocks mk1 KW V3 kits so they are 'made to order' at the factory and drop-shipped). And it was well worth the wait indeed - what beautiful components these are, made of stainless steel and polymer materials. And not only are they compression and rebound adjustable over a wide range, but the compression system is a dual valve design that bypasses the adjustable valve when the car hits a rough bump, letting the strut/shock move to absorb the bump without upsetting the car while using the more restrictive adjustable valve for control over normal road surfaces - making the system much more 'street friendly'.
The V3 kit comes with 342lbs/in front and 285lbs/in rear springs with additional 'tender' springs that are meant to keep the springs under slight compression when the wheels are fully unloaded. The problem with 342/285 springs for a mk1 VW is that they are a bit too soft on the track and a bit too stiff on the street. A great track setup is around 400-500lbs/in front and 300-400lbs/in rear (with a big rear sway bar) for a 2000lbs mk1 VW and a tolerable street setup is around 250/200 - many people run stiffer than that on the street BUT they put up with a lot of crashing over rough pavement - trust me, I have driven almost 10,000kms on 300/250 springs with seriously stiff racing Bilstein struts/shocks and they don't suit themselves to about 50% of the roads out there in the real world.
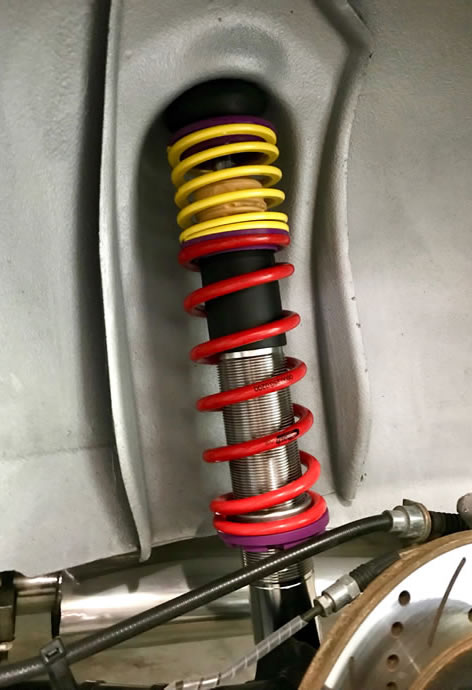
So I swapped in my newer Eibach 7"/8" 250/200 springs (2.5" ID) for the KW 342/285 springs and dialed back the compression/rebound to 1 click off 'full soft' and the KW V3s became truly transformative. All of the banging and crashing over rough surfaces was gone and in its place is a supple ride that is still quite sporty, limiting body roll to a few degrees when yanking the wheel back and forth (let's call this 'drive with spouse' setting). Steering feels lighter at center, the car feels calmer and more confident, and it still has very good turn-in and dynamic movement control. I next dialed back in more compression/rebound stiffness: +2 clicks is more sporty without harshness (will be my default setting for daily use), +3 clicks starts to get into the harsh mode but still acceptable for general performance use (my boy-racer mode), +4-5 clicks starts to enter into the prior Bilstein zone - very stiif and not very street triendly (track use ...). Now I realize how stiff my Bilstein p/n V36-0059 rally race front struts really were - they are perfect on the track with 440lbs/in springs but are too much for me on the street - August 26, 2019

Index of Project web pages:
Project Overview, Goals & Specs
Project Car Initial Condition
Chassis Development
Bodywork & Paint
Suspension, Steering & Braking Systems
Engine, Oiling, Cooling, Transmission & Exhaust Systems
Electrical, A/C & Fuel Systems
Interior
Performance Validation
Final Street Trim Conversion
VW Vortex thread on this project
Videos # 001 - 049 (Feb 2013 - May 2014)
Videos # 050 - 099 (Jul 2014 - Sept 2015)
Videos # 100 - 149 (Sept 2015 - May 2017)
Videos # 150 - 181 (May 2017 - Dec 2019)
My original 1983 Rabbit GTI (owned 1983-1987)